♠ 21012015 ♠ Legoman ♠
The software I used is Autodesk 3ds Max 2015.
|||||||||| BASIC FUNCTIONS ||||||||||
█ REFERENCE █
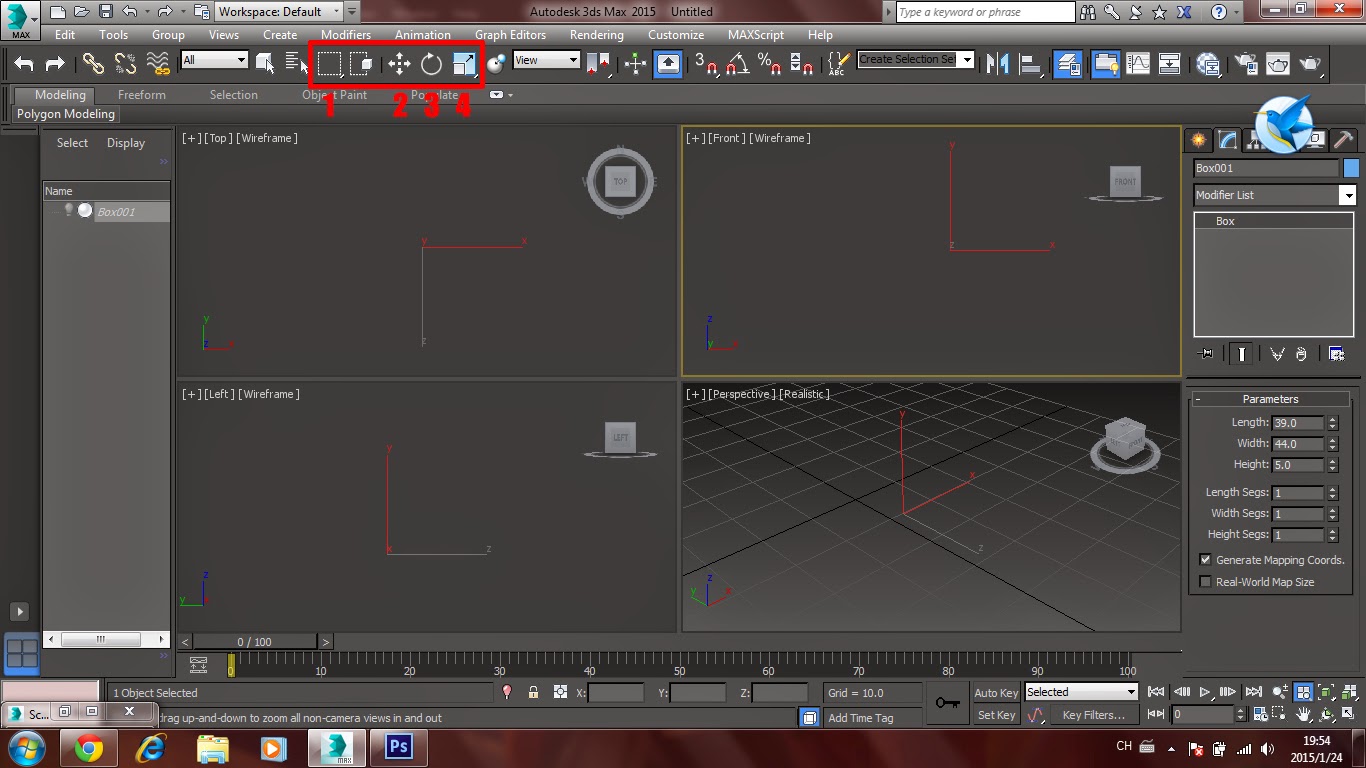
1. [Q] Select object.
2. [W] Move object.
3. [E] Rotate object.
4. [R] Skew object. (Change the Size of object)

From the box on the right-hand side, you can choose the shape that you want to build.
*Normally, I use Standard Primitives.
|||||||||| TASK : LEGOMAN ||||||||||
█ REFERENCE █


|||||||||| PRACTICE : ALIGN ||||||||||
█ REFERENCE █

1. Create the base of the cupboard. (Select Box)
2. Change its length(39), width(5) and height(44).
* It is under the Parameters.

3. Create the side of the cupboard. (Select Box)
4. Change its length(39), width(5) and height(175).
 |
| Front View |
5. Align the position of the boxes created. (Select the button with the red box.)
6. Deselect the ticks of X position, Y position and Z position.
7. Select minimum (under current object) & maximum (under target object), select Y position.
8. Select maximum (under current object) & maximum (under target object), select X position.
 |
| Top View |
9. Deselect the ticks of X position, Y position and Z position.
10. Select maximum (under current object) & maximum (under target object), select Y position.

11. Select the Box002 from top view, press shift and move it to the left-hand side.
12. Select copy, click ok.
13. Like just now, align the position of it.
14. Select minimum (under current object) & minimum (under target object), select X position.

11. Select the Box001 from front view, press shift and move it upward.
12. Select copy, click ok.
13. Like just now, align the position of it.
14. Select minimum (under current object) & maximum (under target object), select Y position.

15. Select the Box001 from front view, press shift and move it upward.
16. Change its length(39), width34) and height(1.25).

17. Align position.
18. Select maximum (under current object) & minimum (under target object), select Y position.
19. Right click the select&move tool (red box in screenshot), change the Y on right-hand side to -34.
20. Copy Box005 and repeat the step 18 & step 19.
21. Repeat step 20 until the cupboard is completed! (≧▽≦)/
█ END RESULT █

|||||||||| PRACTICE : VERTEX ||||||||||
█ REFERENCE █


2. Click the select&move tool, you will see a yellow '+' when you mouse over a vertex,
3. Then, move it to the position that you want.


4. Select all and change the colour of it.

5. Group it together so you can copy the whole object easily. Move it by using the vertex and combine it to become a new design! (≧▽≦)/
In my opinion, I think this method is easier to align the position of the object.
|||||||||| TASK : FIND REF. ||||||||||
█ REFERENCE █
References for next class:
♠ 28012015 ♠ Car ♠
█ REFERENCE █


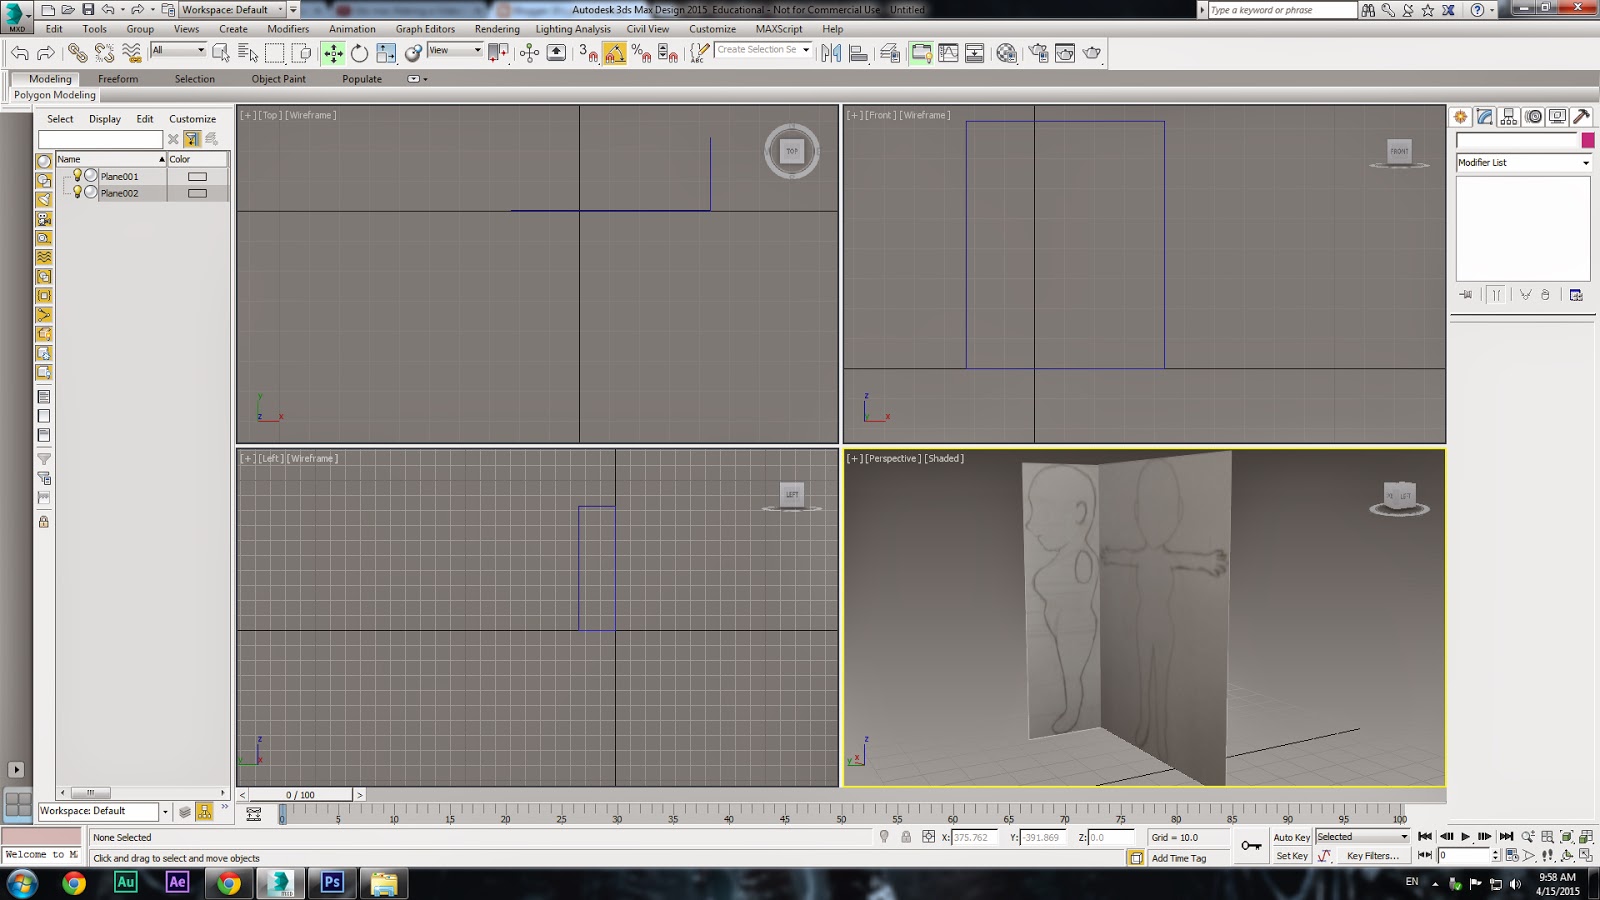
1. First, I go Google find a blueprint of a car.
2. Next, I use Photoshop cut this blueprint into four views and save them as (front, back, top, side) separately.
*Cut it as accurate as possible.

3. Create a plane and change its size based on the image you cut just now.
4. Press SHIFT to copy the plane, change its size according to different views and rotate it to correct position.
5. Repeat this step until four views are done.

6. Go to Material Editor, click on Get Material (1).
7. Click Standard > Diffuse > Bitmap, then select your image.
8. Change the width and height according to your image. *Rotate if necessary.
9. Click Assign Material to Selection (2) and Show Shaded Material in Viewport (3).


10. Select the front and back view plan, right click, select Object Properties, choose By Layer, then click on Backface Cull. This is to make it looks transparent.
* If the size is not accurate, you can change its height manually.

♠ 04022015 ♠ Different Shape ♠
|||||||||| PRACTICE : COKE CAN ||||||||||

|||||||||| PRACTICE : CUP ||||||||||

|||||||||| PRACTICE : CHAIR ||||||||||

|||||||||| PRACTICE : DICE ||||||||||


|||||||||| TASK : LAMP ||||||||||
█ REFERENCE █


█ END RESULT █

♠ 11022015 ♠ Texture & Lighting ♠
|||||||||| PRACTICE : WORDS ||||||||||

Type the words.

Choose 'Bevel' to make your words become 3D.

Give material to your words.

Make a plane for it to reflect.

All the segments are decreased to 1 only.
Select the edge and extend it at 90 degree (as shown in the figure above).

Chamfer the edge.

Add spotlight (or different types of lights).
Adjust the position of the lights until you are satisfied with it.
█ END RESULT █


|||||||||| TASK : BALL ||||||||||
█ REFERENCE █


%2BSS001.jpg)
Create a plane and a sphere.
%2BSS002.jpg)
Add texture (apply bump).
%2BSS003.jpg)
Add lights.
█ END RESULT █
.jpg)
.jpg)
♠ 11022015 ♠ Character ♠
|||||||||| PRACTICE : BAYMAX ||||||||||


█ END RESULT █

♠ 25022015 ♠ Lathe (Wine Glass) ♠
█ REFERENCE █


█ END RESULT █


♠ 25022015 ♠ Ring ♠

1. Make a cylinder. (*16sides)
2. Extrude two times and scale it until you are satisfied with it.
3. Use 'Cut' to cut more lines (image above).

4. Select the polygon above and delete it.
5. Use 'Cap'.


6. Select these vertex and move down a bit.
7. Select the bottom edges and click 'Connect'.

8. Use 'Cut' to cut more lines. (Image above)


9. Select the area above and delete it. Then, click 'Cap'.
10. Repeat this steps for another four.


11. Select these two vertex, click 'Collapse'.
12. Repeat this steps for the other vertex at interval.


█ END RESULT █


♠ 04032015 ♠ Watch ♠


1. Create a plane, set the reference image.
2. Right click select object properties and make changes as shown in the image above.
2. Right click select object properties and make changes as shown in the image above.
3. Create a cylinder.

4. Use spline to draw a circle. Then, use line to draw a shape as shown in the image (LHS).
5. Go modifier list and select bevel profile.
5. Go modifier list and select bevel profile.
6. Create another cylinder to delete the unnecessary part (by using boolean).
7. Copy two more and place them at the correct position.


8. Create a box and rotate it a bit to match the bending level of the outer ring.
9. Find the center position of the ring, copy down.
10. Select the box and choose 'affect pivot only'. Set the number just now to the box's X&Y position.
*Click one more time after using the 'after pivot only'.
11. Rotate it and copy few more.
12. Do another sets by repeating the steps above.


13. Change 'View' to 'Local'; Click on 'Affect Pivot Only' & 'Center to Object'.
14. Click 'Mirror' and choose the suitable axis to reflect.


15. Use line to draw the shape(modify it later). Then draw a circle for the outer ring.
16. Select loft, you will get the shape as above.


17. Repeat steps 10&11. (Angle depends on how many hour hand/minute hand).


18. Create boxes and modify the hands of clock.

19. Create a sphere (hemisphere) and change its opacity to 20%.


20. Create boxes and modify the shape.


21. Create cylinder to make the button.
*[center button]Select middle segment from the 3 segments(polygon), extrude and then bevel.

22. Use box to create the bracelet.
The following will be the rendering:


█ END RESULT █


♠ 01042015 ♠ UVW Map ♠
|||||||||| PRACTICE 1 : BOX ||||||||||
|||||||||| PRACTICE 1 : BOX ||||||||||


█ END RESULT █

|||||||||| PRACTICE 2 : BARREL ||||||||||


█ END RESULT █

♠ 08042015 ♠ Unwrap UVW ♠
█ REFERENCE █


█ END RESULT █

♠ 15042015 ♠ Low Poly Characters (Final) ♠
|||||||||| ATTEMPT 1 ||||||||||


|||||||||| ATTEMPT 2 ||||||||||


|||||||||| ATTEMPT 3 ||||||||||


█ END RESULT █
♠ Character ♠


♠ Full Shot Video 01 ♠
♠ Full Shot Video 02 ♠
♠ Single Shot Video ♠
No comments:
New comments are not allowed.