The software I used is Autodesk 3ds Max 2015.
♠ Basic Function ♠
References:
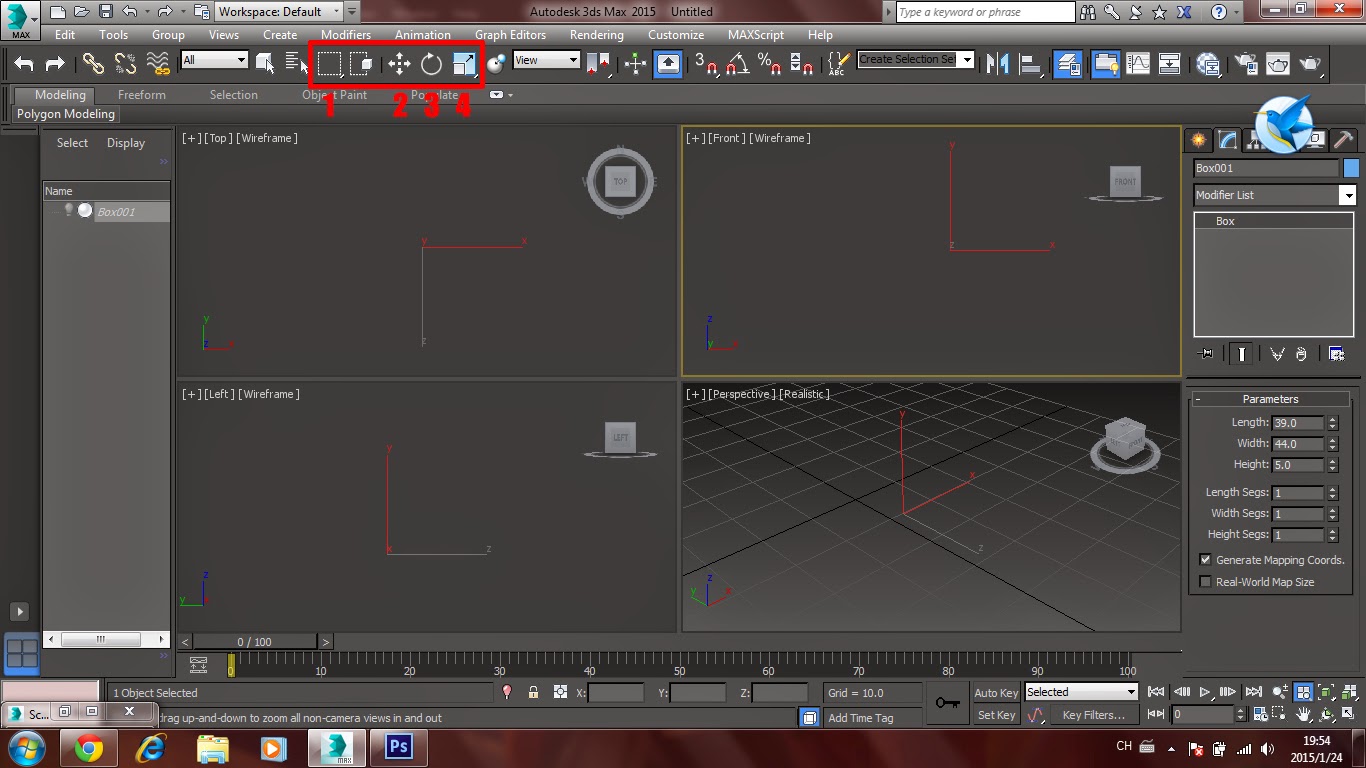
1. [Q] Select object.
2. [W] Move object.
3. [E] Rotate object.
4. [R] Skew object. (Change the Size of object)

From the box on the right-hand side, you can choose the shape that you want to build.
*Normally, I use Standard Primitives.
♠ Task (Lego Man) ♠
References:


https://www.youtube.com/watch?v=u9wghSWKf-c


♠ Practice (Align) ♠
References:
https://www.youtube.com/watch?v=te2fUsKy4wI
https://www.youtube.com/watch?v=bN3vQ0f2QH8

1. Create the base of the cupboard. (Select Box)
2. Change its length(39), width(5) and height(44).
* It is under the Parameters.

3. Create the side of the cupboard. (Select Box)
4. Change its length(39), width(5) and height(175).
 |
| Front View |
5. Align the position of the boxes created. (Select the button with the red box.)
6. Deselect the ticks of X position, Y position and Z position.
7. Select minimum (under current object) & maximum (under target object), select Y position.
8. Select maximum (under current object) & maximum (under target object), select X position.
 |
| Top View |
9. Deselect the ticks of X position, Y position and Z position.
10. Select maximum (under current object) & maximum (under target object), select Y position.

11. Select the Box002 from top view, press shift and move it to the left-hand side.
12. Select copy, click ok.
13. Like just now, align the position of it.
14. Select minimum (under current object) & minimum (under target object), select X position.

11. Select the Box001 from front view, press shift and move it upward.
12. Select copy, click ok.
13. Like just now, align the position of it.
14. Select minimum (under current object) & maximum (under target object), select Y position.

15. Select the Box001 from front view, press shift and move it upward.
16. Change its length(39), width34) and height(1.25).

17. Align position.
18. Select maximum (under current object) & minimum (under target object), select Y position.
19. Right click the select&move tool (red box in screenshot), change the Y on right-hand side to -34.
20. Copy Box005 and repeat the step 18 & step 19.
21. Repeat step 20 until the cupboard is completed! (≧▽≦)/
End Result:

References:
https://www.youtube.com/watch?v=XwvLv9YO5Bo


2. Click the select&move tool, you will see a yellow '+' when you mouse over a vertex,
3. Then, move it to the position that you want.


4. Select all and change the colour of it.

5. Group it together so you can copy the whole object easily. Move it by using the vertex and combine it to become a new design! (≧▽≦)/
In my opinion, I think this method is easier to align the position of the object.
♠ Task (Find references) ♠
References for next class:
No comments:
Post a Comment